· Digital Footprint Check · Content Marketing · 18 min read
How to Wipe a Hdd Completely: a 2026 Secure Guide
Learn how to wipe a HDD completely using software, hardware, and physical methods. Secure your data, protect your privacy, and prevent identity theft in 2026.

You’re probably here because an old laptop, desktop, or external drive is sitting on your desk right now, and you’re trying to decide whether it’s safe to sell, donate, recycle, or hand down to someone else. Maybe you already dragged your files to the Recycle Bin. Maybe you even reformatted the drive and assumed that was enough.
It usually isn’t.
That matters more than is often realized. Old tax PDFs, saved browser exports, scans of IDs, family photos, game account screenshots, work documents, and password reset emails can all outlive “deletion” if the drive wasn’t wiped properly. If that device leaves your hands with recoverable data still on it, the risk isn’t abstract. It can turn into identity theft, account takeover, embarrassing private content resurfacing, or a gaming profile being linked back to your real name and contact details.
Why "Deleting" Files Is Not Enough to Protect You
Deleting a file is a lot like removing the label from a folder in a filing cabinet. The folder may look gone from the front, but the papers can still be inside until something replaces them. That’s why someone can “delete” photos, documents, or chat exports and still have them recovered later with common recovery tools.

A lot of people discover this only when they try to recover their own lost files. If you’ve ever seen a guide to restoring lost data quickly, you’ve already seen the other side of the problem. The same recoverability that helps you rescue an accidentally deleted folder can help a stranger inspect data on a drive you thought was empty.
What “deleted” usually means
On a normal hard disk drive, deleting a file usually tells the system that space can be reused. It doesn’t instantly scrub the old data off every sector. Quick formatting works the same way. It changes the map more than the content.
That’s the gap criminals, opportunists, and even casual buyers can exploit. A second-hand laptop can still hold enough leftover personal information to answer security questions, reveal usernames, or expose old email addresses tied to data breaches.
Deleting is about convenience. Wiping is about privacy.
The real-world risk isn’t just documents
People tend to think about obvious files like tax returns or scanned passports. But your privacy trail is much broader than that. An old drive can also contain:
- Saved browser data that hints at where you bank, shop, or work
- Gaming folders and screenshots that connect a gamertag to your personal identity
- Old chat logs that expose relationships, family details, or workplace conversations
- Dating app images or exports that could be misused or resurfaced later
- Resume drafts and work samples that affect your professional reputation
If you’re trying to clean up the traces you leave behind, offline devices are only part of the picture. It also helps to review ways to delete your online presence so the public web version of your data doesn’t keep circulating after the hardware is gone.
Why this guide matters
Learning how to wipe a hdd completely gives you something simple and valuable. Confidence. You don’t have to guess whether a drive is “probably fine.” You can choose the right method, use it carefully, and know why it works.
That peace of mind is the whole point. If you’re selling a laptop to a student, donating a desktop to family, or recycling a failed PC, you want your files gone in a way that matches the risk.
Your Pre-Wipe Safety Checklist
The biggest mistake people make isn’t using the wrong wipe command. It’s starting too fast.
Once a proper wipe begins, there’s no “undo.” If your photos, save files, tax records, or work archives still exist only on that one disk, wiping it means they’re gone with the drive. Before you do anything destructive, slow down and treat this like surgery, not spring cleaning.
Back up what you actually want to keep
You’re trying to destroy data on one device, not erase your digital life by accident. That means copying anything important to another safe location before the wipe starts.
Focus on the categories people forget:
- Personal records like documents, scanned IDs, invoices, and financial files
- Photos and videos including folders buried in Downloads, Desktop, and old phone backups
- Browser exports such as bookmarks or password manager backup files
- Game data like save files, mods, screenshots, and launcher settings
- Work material including templates, portfolios, and offline project folders
If a file matters, open it from the backup and confirm it works. Don’t assume a copied folder is readable.
Practical rule: If you haven’t tested the backup, you don’t really have a backup.
Make sure you’ve picked the right drive
Many disasters occur at this stage. People connect two or three drives, open a wipe tool, see a list of disk numbers, and choose the wrong one. A family photo archive disappears. A work drive gets zeroed. The old laptop survives while the good external backup is destroyed.
Before wiping, identify the drive using more than one clue:
- Capacity. Match the storage size shown in the system to the label on the drive.
- Connection type. Unplug any drive you don’t need connected.
- Drive letter and volume name. These can help, but don’t rely on them alone.
- Physical location. If it’s an external drive, label it before connecting it.
If possible, disconnect every non-essential storage device. The less clutter in the disk list, the lower the chance of a fatal mistake.
Confirm whether it’s an HDD or SSD
This guide focuses on HDDs first, but the distinction matters because HDDs and SSDs should not be erased the same way. A hard disk drive stores data on spinning magnetic platters. A solid-state drive stores data in flash memory and manages writes differently.
A simple way to approach it:
- HDD means spinning disk, magnetic storage, overwrite-friendly
- SSD means flash storage, firmware-assisted wipe is usually the better choice
On Windows, you can check the drive type in system tools before you begin. On many laptops, you may also know from the model specs or by opening the storage information in the manufacturer utility.
For a wider privacy review before handing off any old machine, it’s worth running an online privacy check so you’re not only removing local data while leaving public personal traces elsewhere.
Prepare what you’ll need before you start
Wiping often fails because people begin the process and only then realize they’re missing a password, adapter, admin rights, or installation media.
Have these ready:
- Administrator access to the computer you’re using
- Power connected so the machine doesn’t shut off during a long wipe
- A bootable USB drive if you plan to wipe the system disk from outside the installed operating system
- Any reinstall media if you want the drive usable again afterward
- Manufacturer tools if you’re dealing with an SSD and plan to use a secure erase utility
Decide your end goal first
Not every wipe has the same purpose. Your method should match what happens next.
| Goal | Best general direction |
|---|---|
| Reuse the HDD yourself | Software wipe, then reinstall |
| Sell or donate the computer | Complete wipe with verification |
| Recycle a dead or untrusted drive | Physical destruction may be better |
| Wiping an SSD | Use SSD-specific erase method |
That choice keeps the rest of the process much easier and much safer.
Software Methods for Complete Data Erasure
For most home users, software wiping is the practical answer. It lets you erase a drive thoroughly without destroying the hardware, which is useful if you want to resell the computer, reuse the disk, or reinstall an operating system afterward.
For traditional hard disk drives, modern guidance no longer requires the old folklore of endless overwrite passes. A key shift came from U.S. government sanitization guidance. The historical standard evolved away from heavy multi-pass routines, and later guidance reaffirmed that a single-pass zero overwrite on HDDs is sufficient for making data inaccessible in practice, while old multi-pass methods like the Gutmann approach were based on outdated assumptions about older drive technology. Dell also notes that Windows Diskpart’s clean all writes zeros across every sector, and for a 1TB HDD this takes about 1 to 2 hours on a 7200 RPM drive in its wiping benchmarks, as described in Dell’s overview of how to erase data from a hard drive.
Using Windows Diskpart for an HDD
If you want a built-in Windows method, Diskpart is one of the most direct ways to wipe a hard drive completely. The clean all command systematically overwrites all sectors on a drive with zeros, rendering traditional recovery software ineffective. It’s launched from Command Prompt with administrator rights, and the critical sequence is list disk, select disk X, then clean all, as described in Microsoft community guidance on wiping a hard drive on Windows 11.
The danger is simple. If you select the wrong disk, you erase the wrong disk.
The command sequence
Open Command Prompt as administrator, then enter:
diskpart
list disk
select disk X
clean all
Replace X with the correct disk number.
Here’s what each command does:
diskpartopens the disk management shelllist diskshows every connected diskselect disk Xtargets one specific driveclean allwrites zeros across the addressable space
After it finishes, the drive will look blank and uninitialized. That’s what you want.
Before you press Enter on
clean all, stop and re-check the disk number against the drive size and connected devices.
Where people get confused
The most common misunderstanding is thinking clean and clean all are the same. They are not. clean removes partition information quickly. clean all overwrites the drive.
If your goal is privacy before sale, donation, or disposal, clean all is the command that matters for an HDD.
When a bootable wiping tool makes more sense
Diskpart is good, but it isn’t always the easiest option. If the drive you’re wiping is the computer’s main system disk, a bootable tool can be cleaner because it runs outside the installed operating system.
Tools in this category include DBAN and other bootable erasure environments. People often choose them when:
- The target drive is the current Windows install
- The computer won’t boot normally
- You want a dedicated interface instead of command line
- You’re erasing several old drives in one sitting
A bootable tool usually starts from a USB stick, loads its own environment, and lets you select the target disk before beginning an overwrite process.
You do not need endless overwrite passes on a modern HDD
On this point, many older guides mislead people. They talk about 7 passes, 35 passes, or all-night wipe cycles as if more is always better. For modern HDDs, that’s mostly outdated advice.
One careful overwrite of the entire drive is the practical standard for normal secure disposal and reuse on traditional hard disks. More passes mainly cost you time.
That matters if you’re helping family members clean old machines or you’re handling several drives at once. A method that is secure and realistic is more useful than one that sounds dramatic but wastes a day.
Here’s a quick way to think about your options:
| Method | Good fit for | Main tradeoff |
|---|---|---|
Diskpart clean all | Windows users wiping an HDD | Command-line risk if you pick wrong disk |
| Bootable wipe tool | System drives, non-booting machines | Requires USB setup |
| Quick format or delete | Convenience only | Not appropriate for secure disposal |
If you want to review other privacy-focused utilities while planning your overall cleanup, a list of internet privacy tools can help you think beyond the hard drive itself.
If you use macOS or a mixed-device setup
The basic principle is the same even if your main computer isn’t a Windows PC. You want a method that overwrites a traditional hard drive rather than just removing file references. On macOS, users often rely on Disk Utility or external boot environments depending on the drive and macOS version.
The important thing isn’t the brand of computer. It’s matching the method to the storage type and confirming the erase is more than cosmetic.
A visual walkthrough can help if you prefer to see the process before trying it yourself:
A note about hidden areas and edge cases
For ordinary HDD wiping, a full overwrite is usually enough. But not every drive behaves like a standard consumer hard disk. Some newer or unusual drive designs need extra care, which matters if your goal is total peace of mind rather than “probably good enough.”
That’s one reason this topic can feel confusing online. Some guides give one universal method for every drive. Real life isn’t that neat.
The Crucial Differences for Wiping SSDs
A lot of people learn how to wipe a hdd completely, then assume they can use the same method on an SSD. That’s where trouble starts.
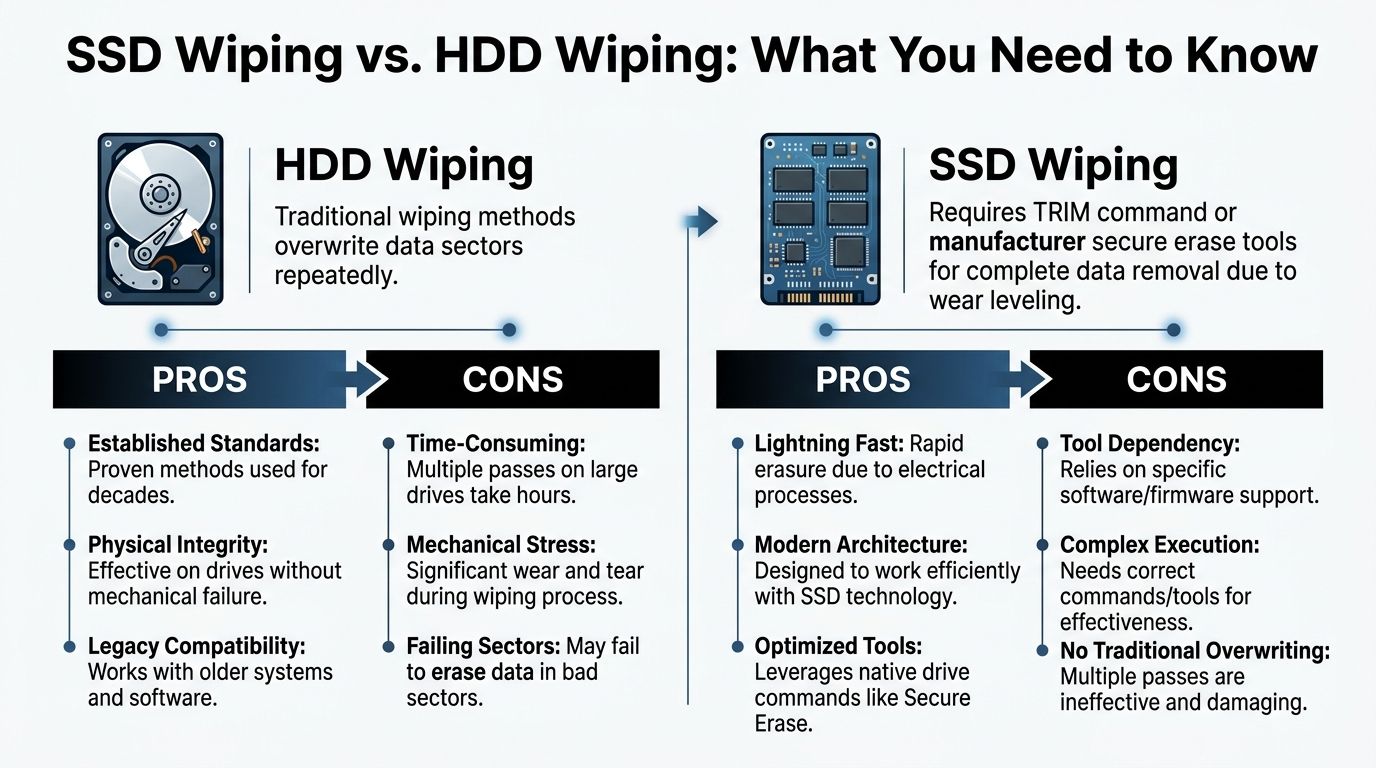
An HDD is like writing on fixed pages in a notebook. If you overwrite each page, you’ve replaced the old content. An SSD behaves more like a smart stack of sticky notes managed by an assistant who keeps moving notes around to reduce wear. You may ask the system to overwrite one spot, but the SSD can write elsewhere and leave old data in places the operating system doesn’t directly touch.
Why overwrite methods can fail on SSDs
SSDs use wear-leveling and often keep over-provisioned areas that the operating system can’t fully address. That means software overwrites can miss data still sitting in reserved sections of the drive.
The stronger approach is ATA Secure Erase. It has been an industry standard since 1994 and tells the drive’s own firmware to reset every storage sector, including over-provisioned areas inaccessible to the operating system. The same source notes this achieves 100% sanitization for SSDs in under a minute, while software overwrites can miss 10-25% of capacity because of wear-leveling. It also cites a 2023 Backblaze report finding that 60% of unwiped SSDs in e-waste retain original data, all discussed in this Microsoft Tech Community post about deleting everything from an old hard drive or SSD.
That’s the key difference. For SSDs, the best wipe method is usually not “write more zeros from the operating system.” It’s “ask the drive firmware to erase itself properly.”
What to use instead
Common ways to run Secure Erase include:
- Manufacturer utilities such as Samsung Magician for supported Samsung SSDs
- Bootable environments like Parted Magic that expose secure erase options
- Vendor tools designed for enterprise or OEM hardware
Some tools label the feature differently. You may see “Secure Erase,” “Sanitize,” or a similar vendor-specific term. Read carefully before clicking.
If the drive is an SSD, stop looking for HDD overwrite advice and start looking for the drive maker’s erase tool.
A practical decision guide
Use this quick comparison if you’re unsure:
| Drive type | Better choice | Why |
|---|---|---|
| HDD | Full overwrite such as Diskpart clean all | Magnetic sectors can be overwritten directly |
| SSD | ATA Secure Erase or manufacturer erase tool | Firmware can reach hidden and reserved areas |
| Unknown drive type | Identify first, then choose | Guessing can leave recoverable data behind |
If your priority is broader privacy protection, not just hardware cleanup, review how to protect your data online so an erased device isn’t the only thing standing between you and exposure.
One more SSD mistake people make
People sometimes run repeated overwrite cycles on an SSD because they read old HDD advice. That can waste time and add wear without solving the underlying problem.
The better mindset is simple. HDDs often need a careful overwrite. SSDs usually need a firmware-level erase. Same goal, different path.
Verification and When to Choose Physical Destruction
A wipe only gives peace of mind if you trust the result. That raises two practical questions. How do you check whether the drive is empty, and when is software no longer enough?
Verification doesn’t need to be dramatic. You’re looking for evidence that the old file system is gone, partitions are gone or reinitialized as blank, and ordinary recovery attempts don’t produce useful personal files.
How to verify a successful wipe
After a software wipe or secure erase, reconnect the drive and inspect it calmly.
A simple verification routine looks like this:
- Check Disk Management or your OS disk utility and confirm the drive appears blank, unallocated, or freshly initialized
- Attempt file browsing and confirm there’s no visible old folder structure
- Try a basic recovery tool and see whether it fails to find meaningful recoverable content
- Spot-check the capacity so you know you verified the correct disk, not another device
This kind of check matters because human error is more common than tool failure. People interrupt a wipe, choose the wrong option, or verify the wrong drive.
Verification is what turns “I ran a command” into “I know this drive no longer exposes my data.”
When software wiping is enough
For many people, software wiping is the right answer. If the drive is healthy, the wipe completes properly, and you want the hardware to remain usable, there’s no reason to jump straight to destruction.
Software-based erasure is a good fit when:
- You plan to sell or donate a working computer
- You want to reuse the drive
- You need a practical method at home
- The disk responds normally and can complete a wipe
When physical destruction is the better choice
Sometimes the safest answer is to make the drive unusable. That’s especially true when the hardware is failing, the data was highly sensitive, or you don’t want any chance of the drive being reused.
For maximum security, physical destruction methods such as using a rare-earth magnet to disrupt the platters or disassembling the drive with a Torx driver can provide forensic immunity. These methods are irreversible and are appropriate for end-of-life decommissioning rather than repurposing, as summarized in this guide on wiping a hard drive in four steps.
Physical destruction fits these situations
- The drive is dead or unstable and won’t complete a software wipe
- The information was highly sensitive, such as legal, financial, or confidential client material
- You’re recycling rather than reusing
- You want visual confidence that the drive will never reconnect to a system
Be careful with improvised destruction. Safety gear, proper tools, and responsible e-waste handling matter.
Choosing Your Data Destruction Method
| Method | Security Level | Best For | Time Required | Drive Reusable? |
|---|---|---|---|---|
| Software wipe on HDD | Strong for normal secure disposal and resale | Working hard drives you want to reuse or resell | Longer on large HDDs | Yes |
| ATA Secure Erase on SSD | Strong and appropriate for SSD architecture | Working SSDs that need proper firmware-level sanitization | Very fast on supported SSDs | Yes |
| Physical destruction | Maximum practical finality | Dead drives, highly sensitive data, end-of-life disposal | Varies by method | No |
If your concern goes beyond hardware and into public data exposure, personal information removal options are worth reviewing too. A wiped drive protects what leaves your home. It doesn’t automatically remove what’s already circulating online.
Advanced Considerations and Common Mistakes
Most wipe guides stop at “run the erase tool.” That’s fine for many drives, but it misses a frustrating edge case. Some hard drives have hidden or harder-to-reach areas that ordinary overwrite tools don’t always clear the way people expect.
The one worth knowing about is the SMR hard drive, short for Shingled Magnetic Recording.
Why SMR drives complicate wiping
SMR drives use a layered track design. That design helps storage density, but it can complicate complete erasure because standard overwrite tools may fail to clear hidden data sectors the way users assume. According to Avast’s discussion of wiping old hard drives, data recovery firms report a 15-20% success rate in recovering data from “wiped” SMR drives, which means someone selling old hardware could still expose sensitive information if they rely on generic overwrite advice from standard guides on how to wipe an old hard drive.
That’s not a reason to panic. It is a reason to avoid one-size-fits-all advice.
How to handle that risk
If you suspect the drive is SMR, take a more cautious path:
- Identify the model first using a drive info tool or the manufacturer’s model details
- Check the manufacturer’s utility for a firmware-based erase or drive-specific sanitization feature
- Treat generic overwrite guidance cautiously if the drive architecture isn’t standard
- Choose destruction instead if the drive contains sensitive material and certainty matters more than reuse
Common mistakes that ruin a wipe plan
Some errors are technical. Most are simple.
- Selecting the wrong disk is still the biggest one. Extra connected drives raise the risk.
- Using HDD methods on SSDs leaves hidden data behind.
- Assuming format equals erase creates false confidence.
- Skipping verification means you never confirm the result.
- Forgetting niche storage behavior such as SMR can undermine a careful plan.
Privacy is larger than the device in your hand
There’s also a broader privacy point here. Wiping a drive protects against local recovery from that hardware. It doesn’t remove copies already synced to cloud accounts, shared in old messages, cached in public profiles, or exposed in breach databases.
If you’re taking digital privacy seriously, the hard drive is one chapter, not the whole book. The same mindset that leads you to erase a sold laptop properly should also lead you to review old accounts, remove stale profiles, and reduce what strangers can connect back to you.
A clean device lowers one risk. A smaller public footprint lowers many more.
If you want to check what personal information is still visible beyond the device itself, try Digital Footprint Check. Its free checker helps you spot exposed profiles, breached details, and public traces tied to your identity so you can reduce both your offline and online privacy risk before someone else connects the dots.